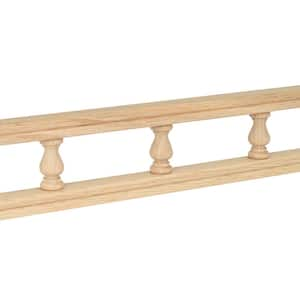
Questions and Answers for Waddell Decorative Galley Rail - 48 in. x 2.25 in. x 0.75 in. - Sanded Unfinished Maple - Shelf and Cabinet Enhancing Moulding
Internet #100549056
Model #5504 MPL
Store SKU #177821
- Perfect for enhancing shelves and cabinets
- Sanded furniture grade maple ready for your custom finish
- Add corner and end posts to avoid difficult miter cuts
Questions & Answers
A: Three inches center to center.
A: 3 inches on center, 2 1/2 inches from spindle to spindle.
A: You can, but I would advise against it unless you or your installer has the experience and tools to do the work. Keep in mind that a brad nailer with 3/4 inch brads must be used with wood glue for all miters. You'll need to cut and dry fit the rail so that the spindles are equally spaced with any miters dead center between the spindles. This is why you rarely see gallery rails in kitchens. Se my review for more information. Good luck! :-)
A: We only needed a small section for the side of a table.
A: You’ll have to plan on paper on how to put the layout of your rail on top of the cabinetry because the main concern is to get the spindles exactly 3 inches apart from each other. If possible, use quadrille paper which makes it very easy to scale your work to show where the splices/miters will be. Buy at least 1 extra rail for 3 feet extra over your total measurements. If you're "cutting corners" at the center of the total run, start here to cut and fasten. Then do the end runs with the corners. Once this is done, you'll find it easier to place the rails-spaced 3 " apart with the miters. (See paper plan photo). I use a jigsaw with a fine blade because cutting the miters is very delicate. I also use a speed square or a miter template for cutting angles. If you plan to use a chopsaw or any type of saw with a blade that has standard thickness to it, take a lot of time and effort going very slowly through that wood. It’s made of maple and will splinter easily with a high-powered circular saw if cutting too quickly. Be sure to "dry fit" all sections before gluing or nailing as well. If you go the jigsaw route, you will need a medium fine wood blade. You'll also need 220 grit sandpaper, wood glue, and a Brad Nailer with a minimum of 1 to 1 1/4 inch Brad nails. If using the brad system, keep in mind that you will be firing these nails on a slight angle. To prevent a "wood blow out", fasten them down going left to right along with the rail and do not fire the nails facing across the rail. This will ensure that you are keeping consistent with the grain of the wood as the nail fastens in. Your miter cuts should be at 46° for the corners and your in-line miters should be at 30°. Most corners are rarely 45 degrees and generally results in a- 1/16 gap. Going 46 degrees ensures no gaps at the outside miter and can be sanded to show a closed fit. To keep the 3 inch spacing at the corners, cut/remove one end spindle to be joined, otherwise, the spindles will be 1 3/4 inches apart. For a "running miter at 30 degrees (straight line-continuous) only cut off a spindle on one side to keep the 3 inch spacing profile. Keep in mind where you place the running miter to be joined. The miters should be centered between each spindle and at least 16 inches away from the corners for a better look and corner support. Use a very light touch of glue on each miter and be sure that you wipe any excess of glue off in the event you want to stain. Leaving any glue on the wood will show up when you staining unless you do a good job sanding the glue off. To keep the corners nice and closed forever, I use just a touch of wood glue and I will tack them very carefully with a five eights inch brad nail on the top in both directions. Use painters tape to keep the miters joined for 12 hours. Be sure to paint or stain everything before you install it. You’ll find that as you make a cut ,you’ll have to paint the ends with a little bit or stain them to keep the consistency that no maple original wood shows. Be sure all sharp edges on your corners are finally sanded so it has a slight rounded affect because paint or stain will not stick to anything with sharp edges or ridges. Because this project has a lot of small areas to paint, I use a semi-gloss or gloss enamel spray paint to get the job done. Maple is a funny wood to paint evenly and you really have to stroke a one inch paintbrush quite a bit to keep it smooth. Spray paint gets it done and you’re done with much better results. You’ll notice on the bottom of the rail that the spindles have a hole pocket indentation on the bottom for each spindle. I’ll put a small tack of liquid nail —just enough on the bottom of every third spindle for a little extra fastening when I attach the brad nails. Once it’s all up and done, I use a Minwax polyurethane varnish so that it’s easier to dust and clean because of kitchen use as grease accumulates over the years. If you’re painting, try to stay with semi gloss or gloss as it’s much easier to keep it clean. See my review with photos. :-)
A: I used a Brad nailer with 1 inch Brad's. It can be simply glued in place.
A: Measure 3 times, that way you'll only need to make your cuts only once. The you have the choice to: Nail, Screw, or Glue (wood glue) your project together and or use any combo of those 3 options. If you need visual instructions during this quarantine time - check out You Tube for assembling handicraft projects. Hope this Helps & Good Luck.
A: I believe there aren’t any curved rails - you could alter the base into an octagon or pentagon as an alternative.
A: No.
A: Sadly, I have never seen them offer a curved variety of this item. ( I purchased mine to create a plate rail on a shelf.)
A: Hi. We would love to help you on this question; however the majority of the folks that provide answers on these forums are not employed with Home Depot. Please give your store a call. All questions are advertised nationwide. H.D. has over 2200 stores and every store’s services vary from city to city as your location/where you live are not disclosed to us. Buying, ordering, price quotes, and scheduling deliveries are not within the scope of this medium to help you. This forum involves folks with experience to answer questions about self-installing the products they’ve purchased. :-)
A: Hello Dawn, Thank you for your recent inquiry about the Waddell 4 ft. x 2-1/4 in. x 3/4 in. Maple Galley Rail, Maple (Acer). We are unable to check availability for this for Canada. Feel free to check on our Canadian site, www.homedepot.ca. For any other questions, please call us at HomeDepot.ca Customer Service 1-800-628-0525. Thank you for shopping Home Depot.
Compare Similar Items
current item | |||
Interior/Exterior | |||
|---|---|---|---|
Interior | Interior | Interior | Interior |
Installation Type | |||
Glue, Nail | Fully Bonded Adhesive, Glue | Fully Bonded Adhesive, Glue | Glue, Nail |
Moulding Type | |||
Applique & Onlay | Applique & Onlay | Applique & Onlay | Applique & Onlay |
Material | |||
Wood | Wood (100%) | Wood | Polyurethane |
Moulding Use | |||
General Purpose | General Purpose |


